Showing posts with label Most Common. Show all posts

Sunday, 17 February 2013

Set Processes Priority In Winddows XP

Follow this tip to increase the priority of active processes, this will result in prioritisation of processes using the CPU.

CTRL-SHIFT-ESC


1.Go to the second tab called Processes, right click on one of the active processes, you will see the Set Priority option

2.For example, your Run your CDwriter program , set the priority higher, and guess what, no crashed CD’s

Shutdown Your Computer Fast and Quick Trick

Imidiate rapid shut down window
while shutting down window. open task manager(Ctr+Alt+Del),
Select shut down tab. and press ' Ctrl ' key while select Turn Off from dis tab.
Count 5 4 3 2 1 Voila!!! U r window will rapidly shut down.


Speed Up Ur Shut down !!

Start Regedit.
Navigate to HKEY_LOCAL_MACHINE/SYSTEM/CurrentControlSet/Control.
Click on the "Control" Folder.
Select "WaitToKillServiceTimeout"
Right click on it and select Modify.
Set it a value lower than 2000 (Mine is set to 200)
.

and !

Like previous versions of windows, it takes long time to restart or shutdown windows xp when the "Exit Windows" sound is enabled. to solve this problem you
must disable this useless sound. click start button then go to settings -> control panel -> Sound,Speech and Audio devices -> Sounds and Audio Devices -> Sounds, then under program events and windows menu click on "Exit Windows" sub-menu and highlight it.now from sounds you can select,choose "none" and then click apply and ok. now you can see some improvements when shutting down your system.

Freeup or clean RAM using Notepad Easy Trick and Make your Computer Fast

system speed. Sometimes the process which have executed but are not required by the OS are stored on the RAM. So, we can remove or freeup the RAM with unused junk data to Speedup the System or processing speed.
We can clean the RAM just by using a Notepad application. This donot require any advanced software. The process to do so is as follows.

Open Notepad

Type
FreeMem=Space(64000000)
save it as “CleanRAM.vbs” on desktop
Note: Type the name of file along with inverted commas
Run the file and your RAM may be free.
Of course you can edit the code in the file for a greater “cleaning-progress”.
For example:
FreeMem=Space(1280000000)
FreeMem=Space(2560000000)
FreeMem=Space(5120000000)
FreeMem=Space(10240000000)

Saturday, 16 February 2013

How to install iOS on iPhone and iPad

Apple has release iPhone and iPod Touch firmware OS software version 3.0. The firmware 3.0 is a major update that adds tons of new features to the portable device. While all generations of original iPhone and iPhone 3G entitles to free upgrade to iPhone OS 3.0 software update, both 1st generation and 2nd generation iPod Touch 2G is required to pay $9.95 to upgrade to to OS 3.0.

Bypass and skip the payment to Apple. It’s obviously unfair practice by Apple towards iPod Touch, who properly do not incur recurring charges. Use the following guide on how to upgrade and update to iPod Touch OS 3.0 software update firmware for free without cost.

How to Upgrade or Update iPod Touch to OS 3.0 Firmware For Free
Update iPod Touch to Firmware OS 3.0
1. Download and install iTunes 8.2 or higher version.
2. Download iPod Touch 2G OS firmware 3.0 Apple Device Software Update

IPSW file, iPod2,1_3.0_7A341_Restore.ipsw or iPod Touch 1G OS firmware 3.0 Apple Device Software Update IPSW file, iPod1,1_3.0_7A341_Restore.ipsw via the iPhone OS 3.0 software update direct download links.
Note: If the downloaded file is in ZIP format (iPod2,1_3.0_7A341_Restore.zip) , then rename the extension from .zip to .ipsw. If the file name is been appended with .zip extension, such as iPod2,1_3.0_7A341_Restore.ipsw.zip, just remove the .zip off the filename.

If you encounter “an error occurred while processing your request” error message when attempting to download iPod Touch firmware, download the IPSW files from here (for 1st generation iPod Touch) or here (for 2nd generation iPod Touch).

Plug in and connect the iPod Touch to computer.
Run iTunes 8.2 or higher.
Select the iPod Touch from Devices list.
Optional but recommended, take a backup of the iPod in case of accidental file lost.
Now there are two ways to update iPod Touch. For user who want to clean and fresh upgrade the iPod Touch, without retaining any existing songs, musics, videos, movies, apps and other media or data files on iPod Touch (mean you will be losing all files stored on iPod Touch), follows these steps:
In Windows environment, press and hold Shift key and left click Restore.
In Mac OS X system, press and hold Option key and left click Restore.

For user who want to retain and save everything that has been uploaded and stored on iPod Touch or ensure that the media is untouched (not losing any files), follow these steps instead:

On the iTunes main screen, there should be 2 options: “Check for update” and “Restore”. Click on Check for update.
A web page showing the iPod Touch OS firmware 3.0 features and offering option to buy for $9.99 will be loaded and shown. Click on Cancel.
iTunes will return to the previous iPod Touch main page. However, the “Check for update” option has now been change to “Update.
In Windows environment, press and hold Shift key and left click Update.
In Mac OS X system, press and hold Option key and left click Update.

Locate and select iPod Touch OS 3.0 Apple Device Software Update IPSW file downloaded in step above.
The update process will start. iPod may reboot a few times. Do not disconnect iPod Touch until iTunes has completed updating iPod Touch.
Once upgrading is done, the iPod Touch will be on OS firmware 3.0, for free without any cent been paid.
Optionally, if you have choose to restore iPod Tunes to firmware OS software 3.0 at factory default, iTunes will offer option to either create a new iPod or restore it from backup. For user already created a backup of iPod, just restore the date files to upgraded iPod Touch.


Note: If there is an error when iTunes attempts to recognize iPod Touch, just unplug and plug the iPod back in again.

Friday, 15 February 2013

HOW TO INSTALLATION WIN XP / SOFTWARES (Complete guidance for installation)

Windows XP installation. (Complete guidance for installation)  

In this page we will teach you the process of windows xp installation and different software. Most popular name Microsoft has designed this operating system. windows xp has all types of features  associated with composing, designing, internet, games etc. 
Now we will start the method to install xp. 
In a fresh pc, we turned on the pc and press delete key or F2 for entering bois. here we will select the booting path. we select Cd rom as first boot device and then save setting and restart the pc. After restarting the pc system will boot from Xp disk which we have entered in Cd rom drive. you will see a massage "Press any key to boot from cd". Here we press any key. Setup starts automatically. After loading some necessary system files a screen message appears. 
We will press the enter key
Next screen appears and we see a agreement page. Here we must have to agree with the policies of Microsoft. For this this purpose we will press F8 key. .
In next step we create partition of Hard drive. In fresh PC system will show "Partitioned space"  We create partition by pressing C key and enter value in MB. For example if you have 80gb hard drive and you want to divide it in 4 parts then you will enter 20000 at first. then 20000 3 times after pressing C key. 
After creating Partition you will select C partition for XP installation. .
Next we will format the partition. setup will show you the four lines for formatting. the hard drive. 
Format drive on NTFS system (quickly) 
Format drive on NTFS system
Format drive on Fat 32 system (quickly)
Format drive on Fat 32 system
we will select NTFS to format the disk. we highlight the line and press enter. Pressing F setup will formats the C Drive and copies windows file into the hard drive. after completion of copying files, system reboots.
Now again message will appear "press any key to boot from cd" but now we will not press any key. As a result system will boot from hard drive and windows xp starts. 
It takes 15 to 25 min to install the complete window. at first after installing hardware setup will be ask for CD key of xp. here we will add 14 digit keys in the specified location. XP key is given below.
((((CD KEY WILL BE PROVIDED YOU AT CD JACKET)
Before entering key you will write your name and company name. after entering cd key press next. 
After this you are free window will automatically install itself on your computer and finally restarts.
Driver's Installation.

After complete installation. we need to install the system software like VGA, SOUND, NETWORK etc. 
For this purpose
  • Right click on My Computer 
  • Click on Manage.
  • Click on Device Manager (System will show uninstall hardware list with question mark)
  • Insert the Driver's CD in Cd rom drive.
  • Right click on 1st hardware and select upgrade.
  • Select "This time only" and click next.
  • Select "install the software automatically (recommended) and click next  
  • Window will automatically select the particular driver for that hardware
  • Then click finish and reboot if necessary.

MOST COMMON WINDOWS PROBLEMS AND THERE SOLUTIONS

common pc problems and their solutions.

1.       My computer’s speed is very slow.

Ans.   There are many reasons for slow speed of computer. At first Increase your RAM (random access memory). In P-4 system 256Mb ram is recommended. Your can increase up to 512 or 1gb for best result.  2nd: Check your hard drive for physical or logical errors or bad sectors. Often Bad sector reduces the speed of computer. 3rd: Check for virus in your computer and also remove unwanted and unnecessary files from your system. These tips will improve the speed of your computer.


2.       During installation of windows xp, setup shows a error “setup can’t copy the 
          files….) when reaches at ‘Kernal Debuger).

Ans. When you try to install XP windows and during setup at “Kernal Debuger” point you see a error, it mean that there is some problem in your system’s Random Access Memory (RAM). Replace your system’s ram and run setup again.


3.       When I start my pc, a message appears “operating system not found”

Ans.   1st. start your pc and by pressing Dell or F2 enter into system setup and check your hard drive detection. In advance system option check for Primary or secondary drive. If your data cable and power supply connector is connected accurately with hard, then here you will see the capacity of hard drive. In this case you have lost your operating system and so install again windows. 2nd: If you didn’t find any hard drive detection in setup, it mean that cables are not connected with hard drive. Also there could be any physical problem in your hard drive.


4.       There is not display on monitor. Beep Found.

Ans.   When you start your pc, you just hear a beep and there is no display at all. If you hear beep 2 times continuously, it mean there is some problem in your Ram and if you hear beep once after a little gape, it means your display adapter is not working. In case of display card (VGA) you can also check the connectivity of card on your mother board if you are using external card. In case of built-in, use external VGA card.


5.       When I play any 3d game, my system goes slow down.

Ans.   When a system become slow while playing a game, it means you are using low speed graphic card. Many cards are available in market. Mostly 128MB or 256MB card gives better performance for games and graphics.


6.       Video movie doesn’t play in normal speed. 

Ans.   It is also because of low speed graphic card. Replace with high speed graphic card, as a result video result will be better.


7.       When I play a song or video movie, system stops

Ans.    This problem is often caused by sound hardware. When we play a movie then graphics and sound both work at same time. So if any hardware is not functioning well then your system will become hang.


8.       How can I improve Windows XP speed?

Ans.   There are some tips for improving XP speed. Clean your desktop and delete all unnecessary & unwanted file from your desktop. Run disk clean up to remove unwanted files from your system, Run disk Defragmenter to increase more space for windows to work fast. click start, run, type. "prefetch" and enter. A new window will appear, remove all files shown there. Again click start, run, type "%temp%" and press enter. remove all files shown in the new window. By applying these setting you can increase speed of your computer.

BURN CD WITHOUT SOFTWARE IN WINDOWS XP

Burn a cd in win xp without any burning software.
In win. 98, Me, 2000, often a software is used to burn a CD, but Windows XP comes with a builtin CD copy feature. If you are using a system which has not any burning software don’t worry. With the help of windows XP feature, you can write some data or any music files to a CD/DVD or erase it also.
 Main Requirement.
Before you erase or write a CD you need to enable the CD-R features n windows XP. For this purpose:
  • Double click on “My Computer
  • Right click on CD Drive and select “Properties”.
  • Select the last option “Recording
  • Select by clicking “Enable CD recording on this drive
  • Also select Fastest for quick writing speed.
  • And at last click “Ok”
  • You’re done. Now the windows XP is ready to write or erase any CD/DVD.
Method to Format the Disk.  
You are using the CD for writing purpose, make sure that disk is blank. You might need to format it before use. For this purpose
  • Insert a Rewritable CD/DVD into the drive.
  • Double click on “My Computer
  • Open CD-Rom drive.
  • Windows opens that shows the contents of the CD, on the left panel click on the menu. “Erase this CD-RW”.
  • On the windows “CD writing wizard” click “Next”
  • The wizard starts to erase or format the CD.
  • After complete process, the wizard will disappear.
  • You should confirm that windows don’t show any files on the CD,
  • It is complete now. You’re done.
Method to Burn a CD on XP without any software.  
  • At first insert a formatted CD (CD-R) disc into the CD drive.
  • Double click on “My Computer
  • Select the files & folders and press “Ctrl + c” to copy.
  • Double click on CD Rom drive and press “Ctrl + v” to paste.
  • You will see as temporary files/folders at this time.
  • Select “Write these files to CD” on the left panel.
  •  The window “CD Writing Wizard” appears.
  • Window shows default name of CD but you can change the CD name if you wish, then click “Next
  • The “CD Writing Wizard” starts to write files to the CD.
After the successful completion of the CD Writing process, the wizard will disappear and the CD Rom ejects CD automatically.

TIPS TO MAKE YOUR COMPUTER LIFE LONG

TIPS FOR THE SAFETY OF COMPUTER.

Here some tips for the safety of computer. A user can get better result and performance of computer speed by acting upon these tips. 
  • Don't  turn off your computer during working position of windows.
  • Alway turn off you computer manually by clicking on start menu and select shut down. If you are not using a mouse then simply press windows key and then press "U key" 2 times. 
  • Before connecting new hardware i.e cd rom, ram, hard drive etc, Turn off computer completely.
  • Always close Cd Rom by pressing its button, don't apply force on the gate of CD Rom.
  • Don't keep your computer near dinning table and also don't keep any liquid or water near your CPU. 
  • Keep you system in airy atmosphere. 
  • You can use AC in your compute room.
  • Don't use water room cooler in front of CPU.
  • Always turn off computer manually and disconnect your computer from the AC current.

USE-FULL NOTEPAD TRICKS.

hint for world trade center

Every body knows about 9/11.  The flight number of that plane was Q33N. Ok now see some amazing trick.
1.   Open notepad and type this number Q33N.
2.   Increase font size to 70, or 80 etc.
3.   Now select this number and change its font to “Wingdings”
4.   As a result you will be shocked to see the resultant shape.
                                  Q33N


LOG TRICK. (DIARY WITH AUTO DATE & TIME)


             If you want to make a diary which inserts date and time automatically then.

1.   Open notepad

2.   Type ( .LOG ) (no brackets)

3.   Save this file with any name e.g. diary etc.

4.   Reopen the file and see the log book magic.

5.   You will see that the current date and time are automatically inserted.

6.   It will happen every time


NOTEPADE “HIDE TEXT” MAGIC


·   Open notepad and type 4 words separated by spaces. The letters of these words should be 4,3,3,5. For example you can write “mark the kid ahead” or “boys are not quick”  it is also called 4335 rule.

·    Save this file with any name.

·    Reopen your file and see magic.


RESTART YOUR PC QUICKLY.


This trick helps you to shut down your computer quickly after showing a message box. To apply this trick:

·    Open notepad

·    Write this code

@echo off

Msg* I am dead tired now.

Shutdown –c “Error! I will sleep now! Good byeee” –s

·    Save this file on desktop with bat extension.

·    Done.

·    Double click on the saved file, you will see a message and your pc will restart.

DISABLE AUTORUN OF USB AND CD, DVD DRIVES

Disable autorun option of usb or cd dvd drives.

Many people know that when ever they plug in their USB drive into the USB port, automatically an auto play option gets executed. Similarly when they insert CD or DVD in drive, it also shows same option of auto run. Sometime it becomes very dangerous for your computer because if your USB drive contains any virus then it gets executed along with auto run files. As a result your computer or operating system becomes slow. There is a trick to solve this problem. Just follow these steps.
  1. Click start menu and click on RUN.
  2. Type “GPEDIT.MSC” and press enter.
  3. Click on Computer Configuration, then click on “administrative templates
  4. Now click on “system” and you will see a list on right side of the window.
  5. Search Line No. 16. (Turn Off Auto play)
  6. Double click on it and on the resultant window click on “enable
  7. Select “All Drive” to disable all drives.
  8. Click on apply. Done. 

HOW TO MAKE YOUR COMPUTER BOOT FASTER

Tricks to Boot Computer Faster.

Often people say that their computers take a lot of time to start. Many visitors asked me by email about this problems. There are many reasons of this problem. I am telling you a few tricks which will be helpful to solve this problem.
  1. Click start --- run -----enter.
  2. Type “msconfig” and press enter.
  3. In the resultant window go to the “Startup” tab.
  4. You will see a list of programs which also start when we start computer.
  5. All program boxes will be checked. So you uncheck all unnecessary or unwanted programs except antivirus.  
  6. Click on apply and restart your computer. You will feel that your computer is faster than before.
2nd Trick to boot computer faster
       I got this trick from one of my friend.
    1.  Right click on “My computer” and select “Manage”
    2.  click on “Device Manager”. You will see a list of hardware.
    3.  If you are not using USB/COM ports, then disable them.
     4.  Restart your Computer. It will give you more better performance in booting.

HOW TO LOCK YOUR FOLDER

Lock your Folder.

If you want to save your personal files in a folder at home or in office, then you must lock that folder. There is much software available in market to lock folder but I am telling you a new trick which locks a folder without any software.
  • At first create a folder in any drive in which you want to keep your personal files.  For example in drive E: create a folder and rename it. You can write any name that you like. Here we write folder name “personal”.
  • Now create a text file in the same drive.
  • Type,
  • ren personal personal.{21EC2020-3AEA-1069-A2DD-08002B30309D}
  • Save this text file as (hide.bat), you will see a bat file in the drive.
  • Now again create another text file and type…
  • ren personal.{21EC2020-3AEA-1069-A2DD-08002B30309D} personal
  • Save this text file as unhide.bat.
  • Done.
  • Now press “hide” and the “personal” folder will change to control penal and nobody can see its contents.
  • Press “unhide” and….waooooo. you can see your folder in original shape.

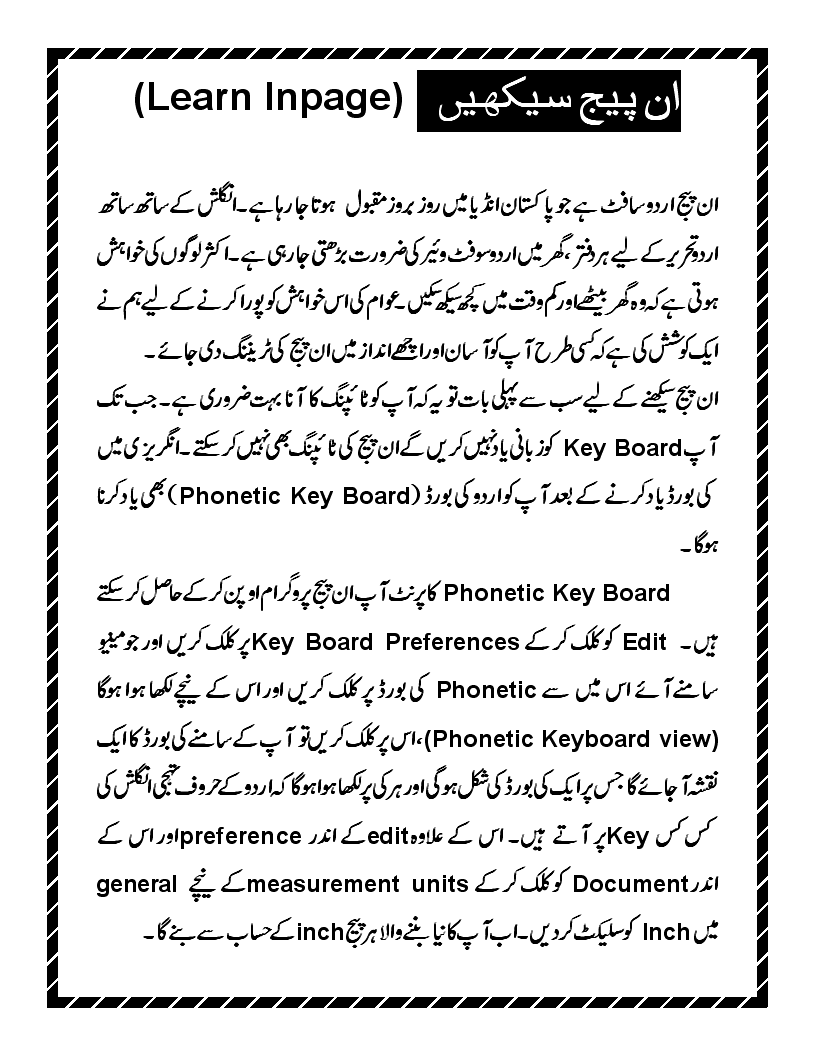
LEARN INPAGE URDU TYPING SOFTWARE


Wednesday, 13 February 2013

HOW TO MAKE YOUR COMPUTER TALK

 
You can create voice from your computer. whatever you will write in the box, computer will talk the same words. process the given below. 
  •  open notepad and write this code. 

Dim message, sapi
message=InputBox("aslam-o-alaikum friend. order me to talk something?","Speak to Me")
Set sapi=CreateObject("sapi.spvoice")
sapi.Speak message

  • in this code i have written (aslam alaikum friend order me to talk something) but you can change it but don't change any other word from the code. 
  • Now save this file with extension .vbs
  • Now write some thing in the box and click ok
  • You will hear the written sentence.
  • Try it now.

HOW TO CHECK THE MEMORY SIZE OF GRAPHIC CARD.

 
CHECK THE MEMORY SIZE OF GRAPHIC CARD. 

You can easily check the memory size of vga card which you are using in your computer. vga 
card of high memory size helps to play heavy games. It also gives better performance to 
those who use Corel and Adobe Photoshop. vga mean "Video Graphic Adapter" To check the 
memory just follow the steps.
1. Right click your desktop and click on properties.
2. Now click on "setting".
3. Click on "advance"
4. Now click on "Adapter".
Here you will see the information about your vga card. You can check chipe type, DAC type, Memory size and bios information.

Monday, 11 February 2013

HOW TO INSTALL WINDOWS FROM USB, PEN DRIVE

If you want to install windows xp on your pc and you feel that your CD drive is not working properly or you have no any optical drive to install windows, than you  can prepare a USB device for installation of windows XP, vista or  7. This is very easy and simple way to make a boot able usb. Normally all notebooks have the option in the BIOS to boot from USB. Many other mother boards like intel 865, 915, 965 etc has also option to boot from USB device. So it is very simple and easy way to install XP on you computer. 
To make a bootable usb, first of all you will install a software "wintoflash". you can easily download this software from the web. The size of this software is approximately 17MB. Install it on your computer and then start this program. It has two different paths. In first browse option you will select windows XP disk and in second browse option, select your Pen drive/USB. Click next to proceed. It will copy all files of windows xp from CD to USB. Now click finish. It is complete. Now you can use this USB for installation of windows.
 

HOW TO DISABLE ERROR REPORTING IN WIN XP

Remove Error in Windows Xp.
Some time an error occurs while you are using XP. A little dialogue box appears asking if you want to send report to Microsoft for this accident or not? Mostly when we press the button “Don’t send” The software we are using, turns off and we do not get any chance to save our working data. You can solve this problem simply and after this process you will not see this error box again. Just follow these steps.
  
Right click on “My computer” and click on ‘Properties”
On system properties dialogue box click on ‘advance tab”
Click on the error reporting button.
Click on “Disable error reporting”
It’s better for you to Place checkmark on “But notify me when critical errors occurs”
Now click Ok.

HOW TO INCREASE SPEED OF HARD DISK TRANSFER

It is common observation that some times our computer slows down due to low performance of hard drive. This problem happens due to the slow performance or poor speed of hard drive. When we say about poor performance, actually we mean, poor speed of reading/writing of hard drive. This problem can be solved by increasing the hard drive speed. Follow these steps to solve your problem.


Click Start menu and select run.
Now type (sysedit.exe) in run and press enter.
System configuration editor will appear.
Here you can see some multiple windows but you will select (system.ini).
This window contains a line (386enh)
Now after this line type (irq14=4096)
Now close this window and save it.
Reboot your computer now.
You will surely feel better performance of your computer.
Enjoy.

HOW TO USE KEYBOARD WITH MOUSE (ON SCREEN KEYBOARD)

If you feel that your external keyboard is not working properly or some particular key is not functioning then you can use internal keyboard on your desktop screen. This property of keyboard is found in windows xp and seven. Just follow these steps
Go to start menu and press “run
Type  “osk
Now press enter.
(note. Don’t use commas)
you will see keyboard on your desktop screen. Now use mouse to click on keys for operation.

HOW TO HIDE FULL DRIVE PARTITION

Hide full drive partition.
It is often seen that many people want to secure their data from other users or their friends. For this purpose they use different methods to hide their data but all these tricks are not reliable. BUT now I am telling you a secure method to hide full drive. You can put all your data in a drive and after applying this trick you will be able to hide full drive. To learn this trick, follow these steps.

  • First of all logged into administrative account.
  • Click on start, open run and type “CMD” and press enter.
  • Type “diskpart” and press enter.
  • After few seconds diskpart utility will appear.
  • Now type “list volume” to show list of volume and press enter.
  • Select the Drive or volume that you want to hide. If you have four drives C,D,E,F, and you want to hid “D” drive, then type “select volume 1”  and press enter.
  • Now in the next step type "remove letter D" to hide this drive.
  • Close CMD and open My computer to check…drive D is not there…
  • Now if you want to show the hidden drive then in step 7 type “assign drive d” and check “My computer”. Drive is back now.
  • Excellent trick, try it now.
image (hide system drive)